自己折腾个Rofi配置


自己折腾个rofi配置

有看到别人折腾的rofi很好看,起初以为是主题啥的,后来发现搜到的主题都很丑,想着自己折腾一下

如何开始?

  • 查看了 rofi官方wiki ,里面有简单的配置指引
  • 首先,生成默认的配置文件

    mkdir -p ~/.config/rofi

    rofi -dump-config > ~/.config/rofi/config.rasi

  • ~/,config/rofi config.rasi

    执行完语句后,就可以在 ~/,config/rofi 中找到配置文件了,生成的配置文件是 config.rasi ,我们将这文件改为自己想定义主题的名字,并在运行时加上配置参数,来覆盖默认配置

    启动配置

    rofi配置文件

    css

    其中的内容很类似于 css ,比较容易理解,vim使用者可以将下面的语句添加到配置文件的结尾,重新打开后,文件就有了高亮

    /* vim:ft=css

图标

  • 首先为rofi添加上图标,先配置你的启动配置,是以命令行参数的形式添加的配置,命令如下

    rofi -show drun -theme gaara-theme

  • 将上面的命令添加到你启动rofi的地方,例如我的是i3的配置文件

  • 注意这样的配置打开的是 drun 目录,是 desktop 文件的目录,因为需要展示图标,而只有 desktop 文件才有配置图标

    (关于 desktop 文件,我的这篇文章有做过介绍,点这儿)

  • 同时要打开 drun 需要在刚刚生成的配置文件中加入 drun 的配置,但是不加也可以,只是在命令行运行会有警告,快捷启动不受影响

  • 上图中有两行配置,第二行是展示应用的图标

  • 看下效果

图标主题

  • 可以在配置文件中使用下面参数使用你已经安装的图标主题

    drun-icon-theme: "MY_ICON_THEME";

  • 注意: 该图标主题必须存在于 ~/.local/share/icons/ 或者 ~/.icons/ 文件夹中
  • 个人使用 yaourt 安装的主题 numix ,默认安装后,图标文件位于 /usr/share/icons/ ,将需要的文件夹复制一份到 ~/.local/share/icons/ 文件夹中

  • 配置文件这样写,文件夹名,区分大小写

简书

责编内容by:简书阅读原文】。感谢您的支持!

阅读提示:责编内容来自简书 【阅读原文】。酷辣虫无法对本文内容的真实性提供任何保证,请自行验证并承担相关的风险与后果!本站遵循[CC BY-NC-SA 4.0]。如您有版权、意见投诉等问题,请通过[eMail]联系我们处理。
自己折腾个rofi配置

CSS Vim

您可能感兴趣的

Collective #443 Collective #443 August 20, 2018 View All FASTER * Checkbox vs Toggle Switch * Matrix Theme Webcam Filter * Nan...
整理下《前端江湖面试》对自己有益的题目。... 面试题目汇总 前言近期在找工作,也在读 前端面试江湖 这本书,书中整理了很多基础的面试题目,在书中也发出了一些错误。 好记性不如烂笔头,于是整理下对自己有益的题目,都是一些较为基础的题目,后期还会更新。时时刻刻勉励自...
H5页面滚动阻尼效果实现 首先什么是阻尼效果?上网查阅: 阻尼(英语:damping)是指任何振动系统在振动中,由于外界作用和/或系统本身固有的原因引起的振动幅度逐渐下降的特性,以及此一特性的量化表征。 好吧,生涩难懂,没能理解。不过网上有说此效果在i...
The Best Way to Learn HTML and CSS Codes for Begin... Have you heard that to build a website, you need to learn how to code? Although this isn’t necessarily true, learni...
CSS for numbers inside of circles, position is off... I'm trying to style numbers inside of circles but it doesn't look the same in Chrome as it does on iOS. Preview on Ch...

阅读全文

Rofi: 一个窗口切换器,应用程序启动器和dmenu更换


A window switcher, Application launcher and dmenu replacement

Rofi started as a clone of simpleswitcher, written by Sean Pringle - a popup window switcher roughly based on superswitcher. Simpleswitcher laid the foundations, and therefore Sean Pringle deserves most of the credit for this tool. Rofi (renamed, as it lost the simple property) has been extended with extra features, like an application launcher and ssh-launcher, and can act as a drop-in dmenu replacement, making it a very versatile tool.

Rofi, like dmenu, will provide the user with a textual list of options where one or more can be selected. This can either be running an application, selecting a window, or options provided by an external script.

Its main features are:

  • Fully configurable keyboard navigation
  • Type to filter
    • Tokenized: type any word in any order to filter
    • Case insensitive (togglable)
    • Support for fuzzy-, regex-, and glob matching
  • UTF-8 enabled
    • UTF-8-aware string collating
    • International keyboard support (`e -> è)
  • RTL language support
  • Cairo drawing and Pango font rendering
  • Built-in modes:
    • Window switcher mode
      • EWMH compatible WM
    • Application launcher
    • Desktop file application launcher
    • SSH launcher mode
    • Combi mode, allowing several modes to be merged into one list
  • History-based ordering — last 25 choices are ordered on top based on use (optional)
  • Levenshtein distance ordering of matches (optional)
  • Drop-in dmenu replacement
    • Many added improvements
  • Easily extensible using scripts
  • Theming

Rofi has several built-in modes implementing common use cases and can be extended by scripts (either called from Rofi or calling Rofi).

Below is a list of the different modes:

Window Switcher

The window switcher shows the following informations in columns (can be customized):

  1. Desktop name
  2. Window class
  3. Window title

Window mode features:

  • Closing applications with  Shift-Delete 
  • Custom command with  Shift-Return 

Application launcher

The run mode allows users to quickly search for and launch a program.

Run mode features:

  •  Shift-Return  to run the selected program in a terminal
  • Favorites list, with frequently used programs sorted on top
  • Custom entries, like aliases, added by executing a command

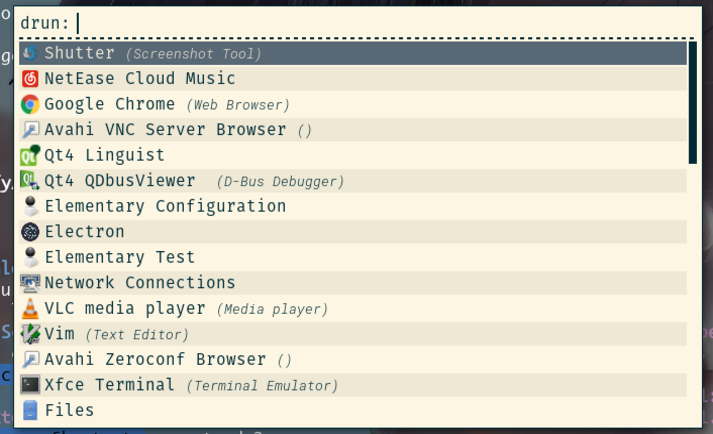
Desktop File Application launcher

The desktop run mode allows users to quickly search and launch an application from the freedesktop.org Desktop Entries. These are used by most Desktop Environments to populate launchers and menus. Drun mode features:

  • Favorites list, with frequently used programs sorted on top
  • Auto starting terminal applications in a terminal

SSH launcher

Quickly  ssh  into remote machines. Parses  ~/.ssh/config  to find hosts.
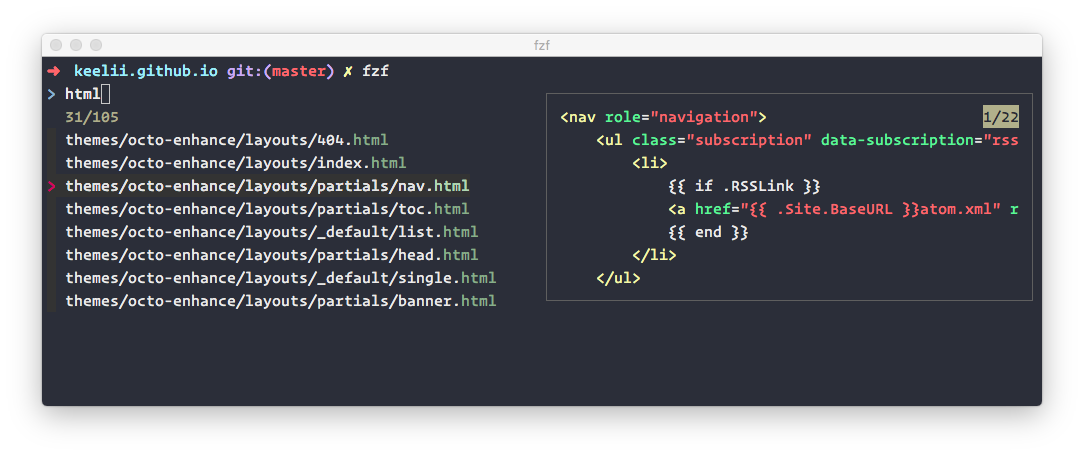
Script mode

Loads external scripts to add modes to Rofi, for example a file-browser.

rofi  -show fb -modi fb:../Examples/rofi-file-browser.sh

COMBI mode

Combine multiple modes in one view. This is especially useful when merging the window and run mode into one view. Allowing to quickly switch to an application, either by switching to it when it is already running or starting it.

Example to combine Desktop run and the window switcher:

rofi -combi-modi window,drun -show combi -modi combi

dmenu replacement

Drop in dmenu replacement. (Screenshot shows rofi used by teiler ).

Rofi features several improvements over dmenu to improve usability. There is the option to add an extra message bar ( -mesg ), pre-entering of text ( -filter ), or selecting entries based on a pattern ( -select ). Also highlighting ( -u  and  -a ) options and modi to force user to select one provided option ( -only-match ). In addition to this, rofi's dmenu mode can select multiple lines and write them to stdout.

Usage

If used with  -show [mode] , rofi will immediately open in the specified [mode].

If used with  -dmenu , rofi will use data from STDIN to let the user select an option.

For example, to show a run dialog:

 rofi -show run 

To show a ssh dialog:

 rofi -show ssh 

dmenu

If rofi is passed the  -dmenu  option, or run as  dmenu  (ie, /usr/bin/dmenu is symlinked to /usr/bin/rofi), it will use the data passed from STDIN.

~/scripts/my_script.sh | rofi -dmenuecho -e "Option #1\nOption #2\nOption #3" | rofi -dmenu

In both cases, rofi will output the user's selection to STDOUT.

Switching Between Modi

Type  Shift-/Left/Right  to switch between active modi.

Key bindings

KeyAction
 Ctrl-v, Insert Paste from clipboard
 Ctrl-Shift-v, Shift-Insert Paste primary selection
 Ctrl-w Clear the line
 Ctrl-u Delete till the start of line
 Ctrl-a Move to beginning of line
 Ctrl-e Move to end of line
 Ctrl-f, Right Move forward one character
 Alt-f, Ctrl-Right Move forward one word
 Ctrl-b, Left Move back one character
 Alt-b, Ctrl-Left Move back one word
 Ctrl-d, Delete Delete character
 Ctrl-Alt-d Delete word
 Ctrl-h, Backspace, Shift-Backspace Backspace (delete previous character)
 Ctrl-Alt-h Delete previous word
 Ctrl-j,Ctrl-m,Enter Accept entry
 Ctrl-n,Down Select next entry
 Ctrl-p,Up Select previous entry
 Page Up Go to the previous page
 Page Down Go to the next page
 Ctrl-Page Up Go to the previous column
 Ctrl-Page Down Go to the next column
 Ctrl-Enter Use entered text as a command (in  ssh/run modi )
 Shift-Enter Launch the application in a terminal (in run mode)
 Shift-Enter Return the selected entry and move to the next item while keeping Rofi open. (in dmenu)
 Shift-Right Switch to the next modi. The list can be customized with the -modi option.
 Shift-Left Switch to the previous modi. The list can be customized with the -modi option.
 Ctrl-Tab Switch to the next modi. The list can be customized with the -modi option.
 Ctrl-Shift-Tab Switch to the previous modi. The list can be customized with the -modi option.
 Ctrl-space Set selected item as input text.
 Shift-Del Delete entry from history.
 grave Toggle case sensitivity.
 Alt-grave Toggle levenshtein sort.
 Alt-Shift-S Take a screenshot and store it in the Pictures directory.

For the full list of key bindings, see:  rofi -show keys  or  rofi -help .
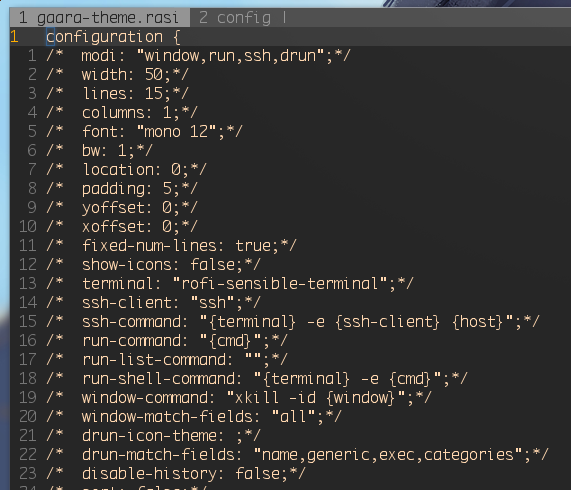
Configuration

There are currently three methods of setting configuration options:

  • Local configuration. Normally, depending on XDG, in  ~/.config/rofi/config . This uses the Xresources format.
  • Xresources: A method of storing key values in the Xserver. See here for more information.
  • Command line options: Arguments are passed to Rofi.

A distribution can ship defaults in  /etc/rofi.conf .

The Xresources options and the command line options are aliased. To define option X set:

`rofi.X: value`

In the Xresources file. To set/override this from command line pass the same key prefixed with '-':

`rofi -X value`

To get a list of available options formatted as Xresources entries, run:

`rofi -dump-Xresources`

or in a more readable format:

`rofi -help`

The configuration system supports the following types:

  • String
  • Integer (signed and unsigned)
  • Char
  • Boolean

The Boolean option has a non-default command line syntax, to enable option X you do:

`rofi -X`

to disable it:

`rofi -no-X`

Manpage

For more detailed information, please see the manpage, the wiki, or the forum.

Installation

Please see the installation guide for instructions on how to install Rofi.

What is rofi not?

Rofi is not:

  • A preview application. In other words, it will not show a (small) preview of images, movies or other files.
  • A UI toolkit.
  • A library to be used in other applications.
  • An application that can support every possible use-case. It tries to be generic enough to be usable by everybody. Specific functionality can be added using scripts.
  • Just a dmenu replacement. The dmenu functionality is a nice 'extra' to rofi, not its main purpose.

阅读全文

ncmpcpp cheat sheet

Keys - Movement

  • Up k - Move cursor up
  • Down j - Move cursor down
  • [ - Move cursor up one album
  • ] - Move cursor down one album
  • { - Move cursor up one artist
  • } - Move cursor down one artist
  • Page Up - Page up
  • Page Down - Page down
  • Home - Home
  • End - End
  • Tab - Switch to next screen in sequence
  • Shift-Tab - Switch to previous screen in sequence
  • F1 - Show help
  • 1 - Show playlist
  • 2 - Show browser
  • 3 - Show search engine
  • 4 - Show media library
  • 5 - Show playlist editor
  • 6 - Show tag editor
  • 7 - Show outputs
  • 8 - Show music visualizer
  • = - Show clock
  • @ - Show server info

Keys - Global

  • s - Stop
  • p - Pause
  • > - Next track
  • < - Previous track
  • Ctrl-H Backspace - Replay playing song
  • f - Seek forward in playing song
  • b - Seek backward in playing song
  • - Left - Decrease volume by 2%
  • Right + - Increase volume by 2%
  • t - Toggle space mode (select/add)
  • T - Toggle add mode (add or remove/always add)
  • | - Toggle mouse support
  • v - Reverse selection
  • V - Remove selection
  • B - Select songs of album around the cursor
  • a - Add selected items to playlist
  • ` - Add random items to playlist
  • r - Toggle repeat mode
  • z - Toggle random mode
  • y - Toggle single mode
  • R - Toggle consume mode
  • Y - Toggle replay gain mode
  • # - Toggle bitrate visibility
  • Z - Shuffle playlist
  • x - Toggle crossfade mode
  • X - Set crossfade
  • u - Start music database update
  • : - Execute command
  • Ctrl-F - Apply filter
  • / - Find item forward
  • ? - Find item backward
  • , - Jump to previous found item
  • . - Jump to next found item
  • w - Toggle find mode (normal/wrapped)
  • G - Locate song in browser
  • ~ - Locate song in media library
  • Ctrl-L - Lock/unlock current screen
  • Left h - Switch to master screen (left one)
  • Right l - Switch to slave screen (right one)
  • E - Locate song in tag editor
  • P - Toggle display mode
  • \ - Toggle user interface
  • ! - Toggle displaying separators between albums
  • g - Jump to given position in playing song (formats: mm:ss, x%)
  • i - Show song info
  • I - Show artist info
  • L - Toggle lyrics fetcher
  • F - Toggle fetching lyrics for playing songs in background
  • q - Quit

Keys - Playlist

  • Enter - Play selected item
  • Delete - Delete selected item(s) from playlist
  • c - Clear playlist
  • C - Clear playlist except selected item(s)
  • Ctrl-P - Set priority of selected items
  • Ctrl-K m - Move selected item(s) up
  • n Ctrl-J - Move selected item(s) down
  • M - Move selected item(s) to cursor position
  • A - Add item to playlist
  • e - Edit song
  • S - Save playlist
  • Ctrl-V - Sort playlist
  • Ctrl-R - Reverse playlist
  • o - Jump to current song
  • U - Toggle playing song centering

Keys - Browser

  • Enter - Enter directory/Add item to playlist and play it
  • Space - Add item to playlist/select it
  • e - Edit song
  • e - Edit directory name
  • e - Edit playlist name
  • 2 - Browse MPD database/local filesystem
  • ` - Toggle sort mode
  • o - Locate playing song
  • Ctrl-H Backspace - Jump to parent directory
  • Delete - Delete selected items from disk
  • G - Jump to playlist editor (playlists only)

Keys - Search engine

  • Enter - Add item to playlist and play it/change option
  • Space - Add item to playlist
  • e - Edit song
  • y - Start searching
  • 3 - Reset search constraints and clear results

Keys - Media library

  • 4 - Switch between two/three columns mode
  • Left h - Previous column
  • Right l - Next column
  • Enter - Add item to playlist and play it
  • Space - Add item to playlist
  • e - Edit song
  • e - Edit tag (left column)/album (middle/right column)
  • ` - Toggle type of tag used in left column
  • m - Toggle sort mode

Keys - Playlist editor

  • Left h - Previous column
  • Right l - Next column
  • Enter - Add item to playlist and play it
  • Space - Add item to playlist/select it
  • e - Edit song
  • e - Edit playlist name
  • Ctrl-K m - Move selected item(s) up
  • n Ctrl-J - Move selected item(s) down
  • Delete - Delete selected playlists (left column)
  • Delete - Delete selected item(s) from playlist (right column)
  • c - Clear playlist
  • C - Clear playlist except selected items

Keys - Lyrics

  • Space - Toggle reloading lyrics upon song change
  • e - Open lyrics in external editor
  • ` - Refetch lyrics

Keys - Tiny tag editor

  • Enter - Edit tag
  • y - Save

Keys - Tag editor

  • Enter - Edit tag/filename of selected item (left column)
  • Enter - Perform operation on all/selected items (middle column)
  • Space - Switch to albums/directories view (left column)
  • Space - Select item (right column)
  • Left h - Previous column
  • Right l - Next column
  • Ctrl-H Backspace - Jump to parent directory (left column, directories view)

阅读全文

晨间日记的奇迹


晨间日记的奇迹
一月 16, 2019. Created by XMind

阅读全文

PicGo图床软件使用教程

项目地址:https://github.com/Molunerfinn/PicGo

阅读全文

Fuzzy Finder(fzf+vim) 使用全指南


Fuzzy finder(fzf+vim) 使用全指南

2018-8-1219:20 PM

简介

Fuzzy finder 是一款使用 GO 语言编写的交互式的 Unix 命令行工具。可以用来查找任何 列表 内容,文件、Git 分支、进程等。所有的命令行工具可以生成列表输出的都可以再通过管道 pipe 到 fzf 上进行搜索和查找

优点

  • GO 语言编写,编译完生成可执行文件没有任何依赖
  • 搜索/查找速度飞快
  • 功能全面/可视化界面体验很棒
  • 周边插件丰富 (vim, tmux, fuzzy auto-completion)

安装

以 macOS 为例子,直接使用 homebrew 安装即可
brew install fzf
# 如果要使用内置的快捷键绑定和命令行自动完成功能的话可以按需安装
$(brew --prefix)/opt/fzf/install

使用

命令行下执行 fzf 即可展示当前目录下所有文件列表,可以用键盘上下键或者鼠标点出来选择
或许你会觉得这个查找提示看起来挺漂亮的,但是并没有什么卵用,因为查找出来就没有然后了。其实这也是 Fuzzy finder 最核心的地方,他只是一个通用的下拉查找功能,自己本身并不关心你用它来做什么,通常我们需要组合使用才会有很好的效果

用 vim 打开文件

比如我们用 vim 组合 fzf 来查找并打开目录下的文件:
vim $(fzf)

切换当前工作目录

再比如进入到某个文件夹下面,使用 fzf 的过滤选择真是太方便了
cd $(find * -type d | fzf)
这是个组合 (cd+find+fzf) 命令,完成切换到任意子目录的功能。可以看出来当 fzf 和其它命令组合使用时就能使得一些操作更方便:
  1. 使用 find 命令找出所有的子目录
  2. 把子目录列表 pipe 到 fzf 上进行选择
  3. 再把结果以子命令的形式传给 cd

切换 git 分支

git checkout $(git branch -r | fzf)
不过这样组合使用命令的实在太长了,如果你不使用自动补全的话巧起来很累的。建议把常用的 alias 放在 .zshrc 中管理嘛

shell 命令行补全

fzf 默认使用 ** 来补全 shell 命令,比起默认的 tab 补全,fzf 补全不知道高到哪里去了。cd, vim, kill, ssh, export… 统统都能补全,好用哭了

配置

fzf 提供了两个 环境变量 配置参数,来分别设置默认的调用命令和 fzf 默认配置参数

核心命令 FZF_DEFAULT_COMMAND

对于使用 fzf 来查找文件的情况,fzf 其实底层是调用的 Unix 系统 find 命令,如果你觉得 find 不好用也可以使用其它查找文件的命令行工具「我使用 fd」。注意:对原始命令添加一些参数应该在这个环境变量里面添加
比如说我们一般都会查找文件 -type f,通常会忽略一些文件夹/目录 --exclude=...,下面是我的变量值:
export FZF_DEFAULT_COMMAND="fd --exclude={.git,.idea,.vscode,.sass-cache,node_modules,build} --type f"

界面展示 FZF_DEFAULT_OPTS

界面展示这些参数在 fzf --help 中都有,按需配置即可
export FZF_DEFAULT_OPTS="--height 40% --layout=reverse --preview '(highlight -O ansi {} || cat {}) 2> /dev/null | head -500'"
界面配置参数加上后就漂亮多了
--preview 表示在右侧显示文件的预览界面,语法高亮的设置使用了 highlight 如果 highlight 失败则使用最常见的 cat 命令来查看文件内容
highlight 安装可能会有个小插曲。highlight 需要手动编译安装,默认安装目录在 /usr/bin, /usr/share 下面。然而在 macOS 中由于 SIP 保护,用户安装的程序不能在这几个目录下面「即使有 sudo 权限也不行」。我们可以手动更改下 highlight 源代码中 makefile 中的参数即可
# PREFIX = /usr
PREFIX = /usr/local
PREFIX = /usr 改成 PREFIX = /usr/local,然后 makesudo make install 就可以了

触发命令行补全 FZF_COMPLETION_TRIGGER

默认是 **,一般不用修改

VIM fzf 插件

如果你使用 vim,那么官方提供的插件会让你的 vim 使用更加流畅

安装插件

如果你本地安装过 fzf 命令行工具了,只需要在 .vimrc 里面添加下面两个插件配置即可
Plug '/usr/local/opt/fzf'
Plug 'junegunn/fzf.vim'
注意:使用了 vim-plug 插件管理
插件主要对 fzf 集成绑定了一些和 vim 相关的功能,比如:查找当前 Buffer、Tag、Marks。甚至切换 window 更换 vim 主题配色等
命令模式下敲 Files 即可选择当前目录下所有文件,Buffers 可以过滤当前所有 vim buffer 内容
再配置几个常用快捷键就可以直接取代 CtrlP 插件了
  • Ctrl + p 查看文件列表
  • Ctrl + e 查看当前 Buffer,两次 Ctrl + e 快速切换上次打开的 Buffer
nmap <C-p> :Files<CR>
nmap <C-e> :Buffers<CR>
let g:fzf_action = { 'ctrl-e': 'edit' }

结语

当然 fzf 还可以在很多其它场景下用来。如果你想使用可视化的列表选择而不是咣咣敲命令,那就自己搭配一些组合来使用吧
»

阅读全文

《实用性阅读指南》读书笔记

读过很多书,却不记得书中讲了什么?

阅读全文

在Github上使用Hexo搭建个人博客

成品示例展示:https://itgoyo.github.io/

1、Hexo搭建

环境

一、环境安装

  1. node.js(在node.js官网中下载安装)node.js官网

  2. git(OS系统中直接安装x-code就可以了)

  3. hexo

1)打开OS系统终端

2)输入安装hexo的代码(此处安装时有可能会提示输入系统管理员密码)

$ sudo npm install -g hexo

如果以上命令安装失败的话,换

1
sudo npm install --unsafe-perm --verbose -g hexo

二、hexo创建静态博客

  1. 新建blog文件夹

  2. 在终端进入该文件夹,初始化博客

$ hexo init

  1. 上述完成后,生成原始文件;blog文件夹就是博客的根目录
  1. 本地查看:启用本地服务命令(退出按ctrl+c)

$ hexo s

  1. 将出现的地址输入浏览器,即可可查看到本地效果

三、github配置

  1. 注册github账号并登陆

  2. 获取本机的SSH口令

1)输入获取代码,回车直到出现图片所示图形为止

$ ssh-keygen

2)输入编译代码

$ vim ~/.ssh/id_rsa.pub
3)出现SSH口令后,将红框部分复制,并在下方输入:q,随后按下回车可以退出该窗口

4)进入到github页面设置SSH口令

点击用户下拉菜单中的settings(step1)

点击左侧的SHH and GPG keys(step2)

在Title中输入口令名称(随意)(step3)

在key中贴上SSH口令(step4)

阅读全文

终端目录跳转软件autojump和z

阅读全文

Linux安装i3wm平铺式窗口桌面

对于颜值的高要求,首先这里安装的时候参考了https://www.github.com/Airblader/i3

阅读全文

本站总访问量

Fork me on GitHub